Electric Wire Rope Hoist Installation and Commissioning
How to install an electric wire rope hois safely? Totay, we will show you the geneal guide on European style electric wire rope hoist installation and commissioning for your reference. Before your hoist installation, please read the safety specification and related contents, distributed with your electric hoist carefully. If you have any need or questions, please feel free to contact us.
Unless otherwise indicated, the standard shipping condition of wire rope hoist is that both wire rope and hook have been assembled, and the wheel gauge or track gauge of trolley wheels have been manufactured or adjusted to position according to the order. The electrical part has been functional tested in the factory, but the lifting height limit needs to be adjusted on site.
Wire rope hoist must be placed in a dry and clean place if not installed immediately.
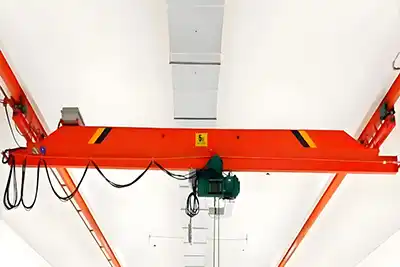
Electric wire rope hoist with European style low headroom design
Pre-installation preparation
The following basic conditions should be confirmed before the installation and maintenance of this hoist.
Adequate personnel (Quantity and skills)
Necessary tools and ensure that the tools are safe to use.
Adequate time (including installation and commissioning time)
Working environment on site (Whether there is a safety risk to the installation personnel and equipment, and check whether the installed hoist is suitable for the working condition)
Attention!
Installation work must be carried out by qualified technicians.
Hoist suspension setting
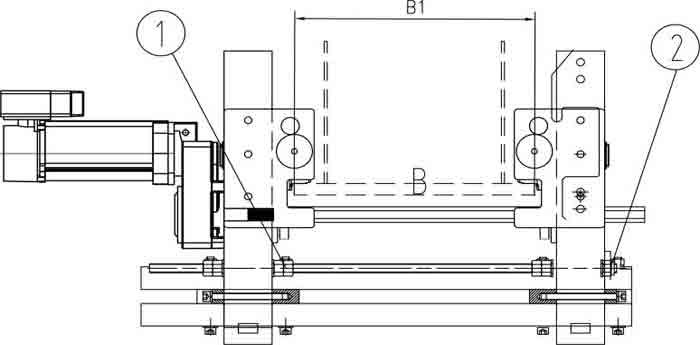
Mono-rail hoist
The width (B1) between the rim of the trolley with mono-rail hoist has been adjusted before delivery according to the order.
Size of B1 is 5 ~ 6 mm larger than the width (B) of the lower edge of the bearing beam.
Before installation, please confirm the actual size of B and B1. If the actual size of B on the user's site is inconsistent with the order and B1 needs to be adjusted, please contact the hoist’s manufacturer.
Loosen the locking nut (unit 1 & unit 2)
Lift the hoist onto the bearing beam.
Adjust the size of B1 to a suitable size (about 5 ~ 6 mm larger than the width of the lower edge of the bearing beam)
Pre-tighten the locking nuts (unit 1 & unit 2).Check the parallelism of all wheels and adjust locking nuts when necessary.
Tighten the locking nuts.
Crab hoist for double girder overhead crane
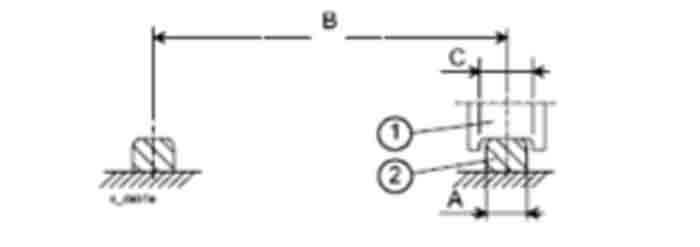
Check the wheel groove width (C) and track tread width (A) of the electric hoist. Standard condition is C=A+15mm.
Check and confirm that the track center distance (B) on the bearing beam is consistent with the track distance R of the electric hoist. Standard condition is B=R±2mm.
Lift the electric hoist onto the bearing beam track and check the parallelism of the wheels.
Trolley gauge (R) and wheel slot width (C) have been adjusted to the appropriate position before delivery according to the order. If the actual size is found to be inconsistent with the hoist parameters, please contact the manufacturer.
Inspection and testing
No-load test
Electrical connection
Check if electrical equipment connections and wiring diagrams are consistent.
Check cable connection status of electrical wiring.
Main power switch (user-provided)
This hoist must be equipped with main power switch according to the requirements of safety operation specification. Main power switch should be installed in the equipment not far from the main power input terminal. It is mainly used for wire rope hoist maintenance by cutting off the main power supply. It can also be used as a stop switch in case of emergency. When the wire rope hoist is installed as a part of the crane, the crane control system should be equipped with the main power switch.
Pendant control system
The pendant controller and quick access plug are optional, and if this option is included in the order, they will be connected together and packaged separately. The appearance and wiring of the pendant controller used in different control modes are different.
Check if the pendant controller and its wires are well connected to ensure it is suspended at a reasonable height.
Press the direction button of the controller to check that the direction indicated by the button is the same as the direction of the action.
If there are errors in all directions of movement, they can be corrected by changing the phase sequence of the power supply.
Check the operation of the emergency stop button. Do not press it during normal operation.
Working noise
The hoist should be checked for errors in installation when it makes obvious noise when travelling and lifting.
Feel the vibration of the hoist by hand during its travelling and lifting.
Check and correct the phase sequence of the power supply if the lifting motor is emitting intermittent loud noise and vibration. If the hoist travelling produces big noise or violent vibration, please check whether the track installation conforms to the specification. Do not use it until the cause of noise or vibration has been found out.
Lifting limiter
Adjust and check the action of the lifting limiter by running the hook to the limit position at the top and bottom.
For safety concern, the lifting limiter switch must be adjusted before each test run.
Travelling limiter (Not in all models)
Check the operation of the travelling limiter by running the hoist to the trigger position.
For safety reasons, the trigger position of the travelling limiter must be adjusted before each test run.
Hook assembly
Check the wire rope pulley for free rotation.
Check the hook head can rotate freely.
Wire rope
Check and make sure the wire rope is not damaged during transportation.
Check the wire rope winding is normal.
Check the fixed end of the wire rope.
The starting load of the new wire rope should be about 10% of the rated load. The load should be lifted 5-10 times to the total lifting height. If the wire ropes intertwine, place the hook in the lowest position without load, open the wedge chamber at the end of the rope and rotate the wedge until the entanglement disappears.
Overload limiter
Check if overload limiter is working properly.
Trolley
Check trolley wheelbase and adjust it correctly.
Check and make sure all screws are tightened and locked.
Run back and forth at least 3-5 times over the entire length of the bearing beam.
brake
Check the operation of lifting motor brake.
Load test (100% rated load)
Motor current
During the lifting operation, check the current of each phase at the rated load.
The current should be balanced at all phases and should not exceed the rated current of the motor.
Motor operating temperature
If thermal protection causes the lift to stop prematurely, find out the cause of overheating before proceeding with the test.
Travelling mechanism
Check if acceleration and braking actions are operating properly.
Run back and forth at least 3-5 times over the entire length of the bearing beam. The track surface shall not be painted.
Overload test (110%-125% of rated load)
Overload limiter
Check the operation of overload limiter under overload.
When the load exceeds the trigger load of the overload limiter, the overload limiter must be able to prevent the lifting action.
Brake
When the load is lowered and stopped at a lower speed, the brake functions normally.
Documents and records
Check documents delivered with hoist to ensure proper entries in documents. The reference data in the document should be consistent with the model nameplate.
Compile the debugging record of the hoist and save it with other files of this hoist.
In order to ensure safe operation, electric hoist manufacturers can arrange user training through a separate agreement.